The FAQ section contains a wealth of information, related to our apps. If you cannot find an answer to your question, make sure to 'contact us'.
 Subscription / Purchasing Issues / Data Restore
Please also ensure your account has sufficient funds, and card hasn't expired
Activation can be triggered by closing and restarting the app.
Otherwise please try tapping 'restore purchase' if this fails.
Please open the Timesheet app
Tap top right > Purchase to navigate to the purchase screen and tap 'restore purchase'
If prompted, please ensure you sign in using the same Apple ID that was used to purchase.
This will download your receipt from Apple and should activate your subscription.
Please ensure you are signed in using the Google Play account used to purchase
The app checks the google store for a valid subscription on start-up.
If you still have any further issues, don't hesitate to contact us from within the app
This information helps us to investigate and resolve any issue as soon as possible.
If purchased via Apple or Google then activation requires you to sign into the Apple or Google Play account used for the original purchase.
If you purchased directly from MDS please deactivate on your old device via the in-app purchase screen.
The remaining subscription can then be activated on your new device using the licence code purchased.
![]() Apple-Restore Purchase
Apple-Restore Purchase
Please open the Timesheet app
Tap top right > Purchase to navigate to the purchase screen and tap 'restore purchase'
If prompted, please ensure you sign in using the same Apple ID that was used to purchase.
That should activate your subscription.
![]() Android-Restore Purchase
Android-Restore Purchase
Please ensure you are signed in using the Google Play account used to purchase
The app checks the google store for a valid subscription on start-up.
If you have any further issues, please 'contact us' from within the app.
Typically this is an email configuration issue. Please checkout the links below for help on setting up email.
![]() Apple
https://support.apple.com/en-au/HT201320
Apple
https://support.apple.com/en-au/HT201320
![]() Android
https://support.microsoft.com/en-us/office/set-up-email-in-android-email-app-71147974-7aca-491b-978a-ab15e360434c
Android
https://support.microsoft.com/en-us/office/set-up-email-in-android-email-app-71147974-7aca-491b-978a-ab15e360434c
Here are some further trouble shooting tips
- Check the device has free storage space so the PDF can be saved.
- Check you have an internet connection.
- Open the device email app i.e. For iPhone/iPad open Apple mail or Gmail on Android.
- Try sending an email with an attachment to yourself.
- Check the 'sent' and 'outbox' folders. An email stuck in the 'outbox' suggests a config issue.
- Check the recipient email is correct. If the email is in the 'sent' folder the issue could be with the recipients email.
![]() Apple Restore Data
Apple Restore Data
- Open the Timesheet PDF or Timesheet Plus
- 1 On the old device backup data via Settings>Cloud.
- 2 On the new device navigate to Settings>Cloud and tap 'Restore' on the data file.
- * Make sure you are signed into the same iCloud Account on both devices.
- Open Timesheet PDF on your old device
- 1 On the old device navigate to Settings>Backup
- 2 Tap Backup Data.
- 3
Data is saved with the file name extension .sql or .sqlite
Note is does vary depending on version but should be similar to timesheet_backup_{todaysdate}.sql or tpdf_data_{todaysdate}.sqlite
Take note of the file location. - 4
Transfer the file to your new phone.
You can copy to Google Drive or an SD Card, or email the file to yourself so it can be accessed for restoring on the new phone. - On the new device open Timesheet PDF and navigate to Settings>Backup.
- 5 Tap Restore data.
- 6 This presents a file picker, search for the folder and the file timesheet_backup_{date}.sql and select.
- * The app will close to complete data restore
Changing Platform
- 1 On your Android device, open Timesheet PDF and perform a data backup in steps 1-4 of Android Restore data as listed above.
- 2 On your iPhone, open Timesheet PDF and setup and link to iCloud via Settings>Cloud.
- 3 Copy the data file (.sql) you made a backup of to your iCloud Drive > Timesheet PDF folder.
- You may need to use a PC, or alternatively email the data file to yourself and save to iCloud to perform this step.
-
4
On your iPhone, open Timesheet PDF and navigate to Settings>Cloud. Tap on 'Restore' to complete the process.
- 1 On your Apple device, open Timesheet PDF and perform a data backup to iCloud as in step 1 of Apple Restore data listed above.
- 2 Copy the data file from the iCloud>Timesheet PDF folder to your Android device.
- You could email the data file to yourself, or copy to Google Drive etc..
- 3 Open Timesheet PDF on your Android device, and perform steps 5-6 of Android Restore Data.
![]() Sorry this is not possible with Timesheet PDF or Timesheet Plus
Sorry this is not possible with Timesheet PDF or Timesheet Plus
MDS is bound by rules for developers (Applied by Apple/Google) as well as licensing policies
that prevent us from granting license transfer from the platform
you purchased it for to a different one.
It is suggested you cancel your current subscription, and purchase on the new platform.
![]() Sorry to see you leave
Sorry to see you leave
If there is any issue we can help with before you cancel please contact us
Apple and Google handle all money related issues as they are the app distributor. We just write the software.
Please visit the relevant link below:
https://support.apple.com/en-au/ht202039
https://support.google.com/googleplay/answer/7018481?hl=en&co=GENIE.Platform%3DAndroid
 Timesheet PDF
on the top menu bar tap the top right button labelled 'Client'
Tap + to add or tap on a client to edit
Client Label
The label can be changed as per your terminology.
i.e. Customer, Employer etc.
Change the label by tapping Settings>PDF>Client label
Different rates are set for each client. Simply select and edit a client and enter the rates.
Changing rates
Q
If I change hourly or travel rate (i.e pay increase..) will this alter the rate for existing entries?
A
The new rate will apply to new entries, and any existing entries not sent or not paid ( ![]() red icon)
red icon)
This will not change entries flagged as paid or sent ( ![]()
![]() blue or green icon)
blue or green icon)
First create a weekly entry.
On the top menu bar tap the expense button to view expenses linked to the weekly entry.
![]()
Tap + to add a new expense, or tap an expense to edit.
![]() Apple
Apple
Tap the down arrow followed by edit/delete to enter delete mode.
Note:
The delete function is disabled in the trial version.
Subscription is required to unlock deleting entries.
![]() Android
Android
While viewing the time entry, tap the top right menu>delete
Detailed Report
Tap the ![]() blue folder button to create the detailed report.
blue folder button to create the detailed report.
Change the start and end date for the time frame you require.
You can create weekly, monthly or even yearly reports.
Bi-Weekly Report
Tap the top right menu followed by bi-weekly
Now select two entries for the report.
The button to add a new shift is located below the Total Hours for the shift.
 Apple - Tap the Add Shift button.
 Android - Tap the + button.
To Delete the shift
 Apple - Swipe left.
 Android - Tap the more button
  then Delete.
Detailed Report
On the detailed report, each shift will be shown as a line item
Single Page and Bi Weekly Report
On the single page report, the start time and latest finish time is shown.
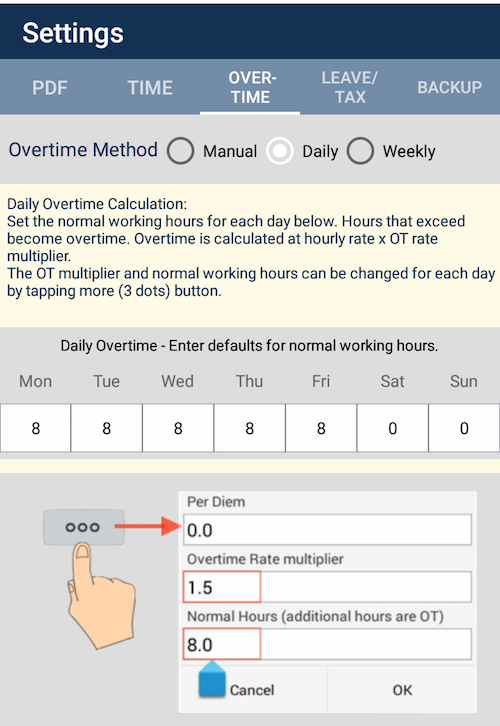
Daily overtime
Set the normal working hours for each day.
On the time entry form tap ![]() to modify the overtime rate for the day.
to modify the overtime rate for the day.
Enter hours for the day exceeding this limit will have the overtime rate applied.
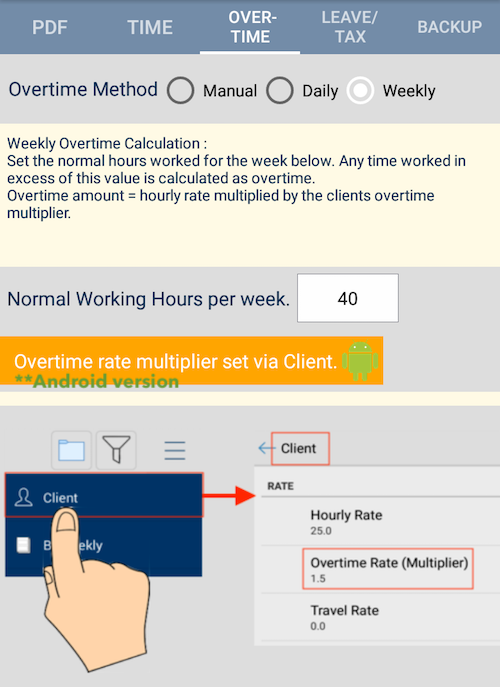
Weekly overtime
Set the total normal working hours for the week.
Hours exceeding this total will have overtime rate applied.
Select this option to enter all overtime manually.
This Setting applies to Daily Overtime and Manual Overtime Setting only.
Tap the more button ![]() for the shift.
for the shift.
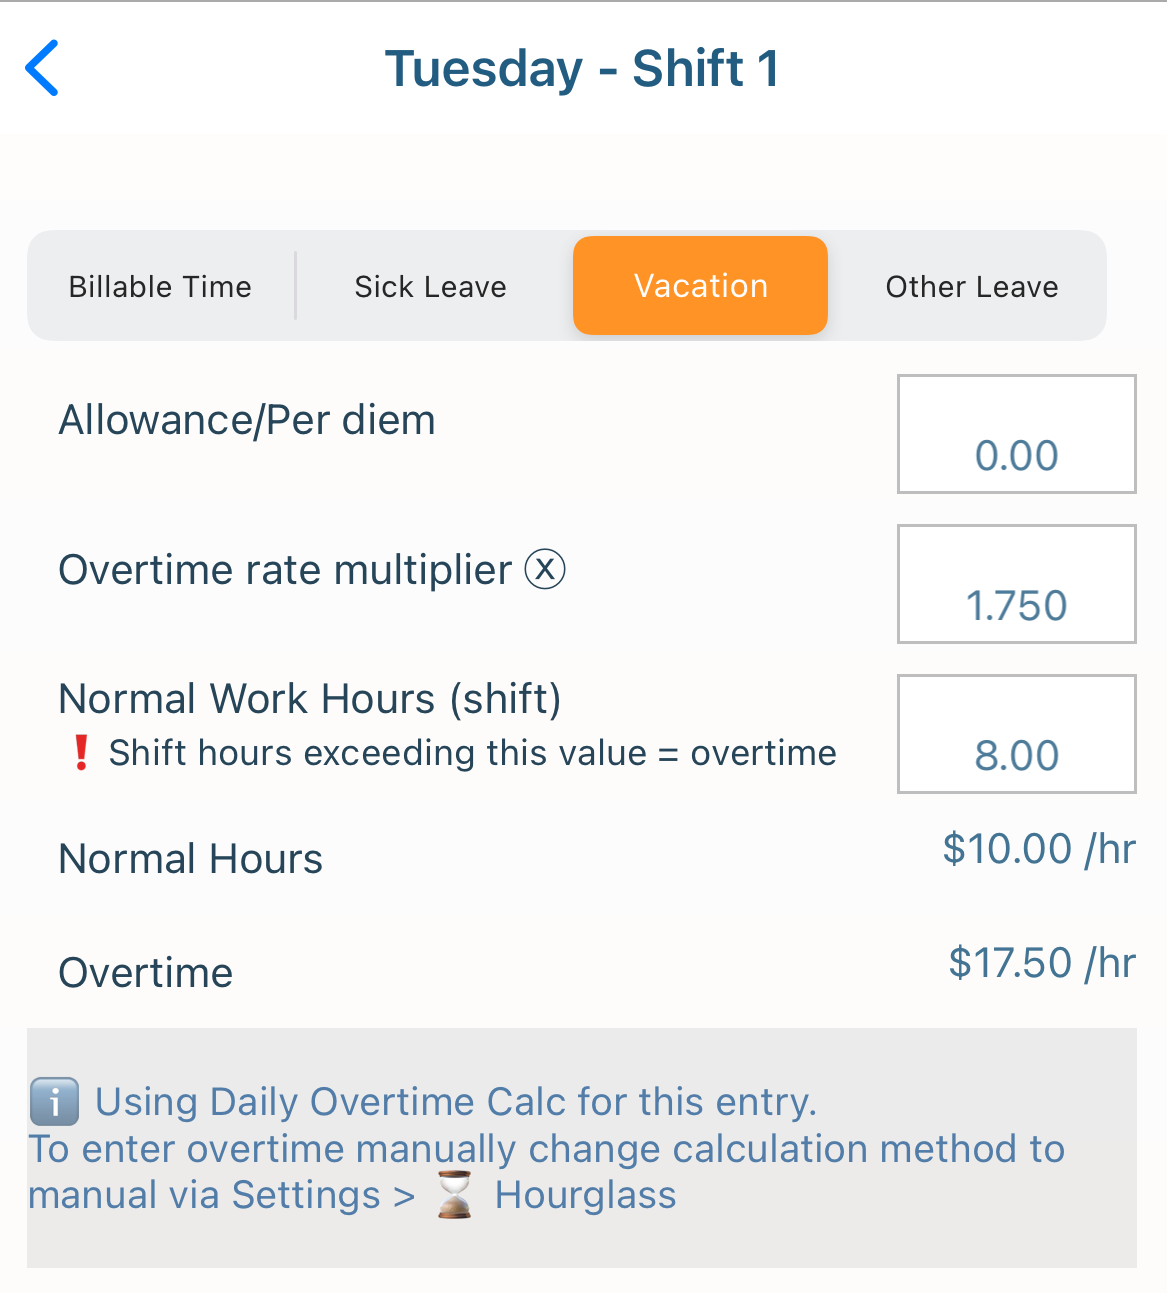
This presents a screen with options to set the Normal Work Hours
and the Overtime Rate Multiplier.
Example 1 : Normal shift (8 hours) followed by an evening shift (5 hours) paid as overtime.
Shift 1 - Enter 8am to 9pm which includes
Overtime paid at 1.5x from 4pm to 9pm
Tap the more button ![]()
Set Normal Work Hours to 8
Set Overtime Rate Multiplier to 1.5 (Time and a half).
This pays pays first 8 hours at normal rate, then 5 OT hours at 1.5 x normal rate
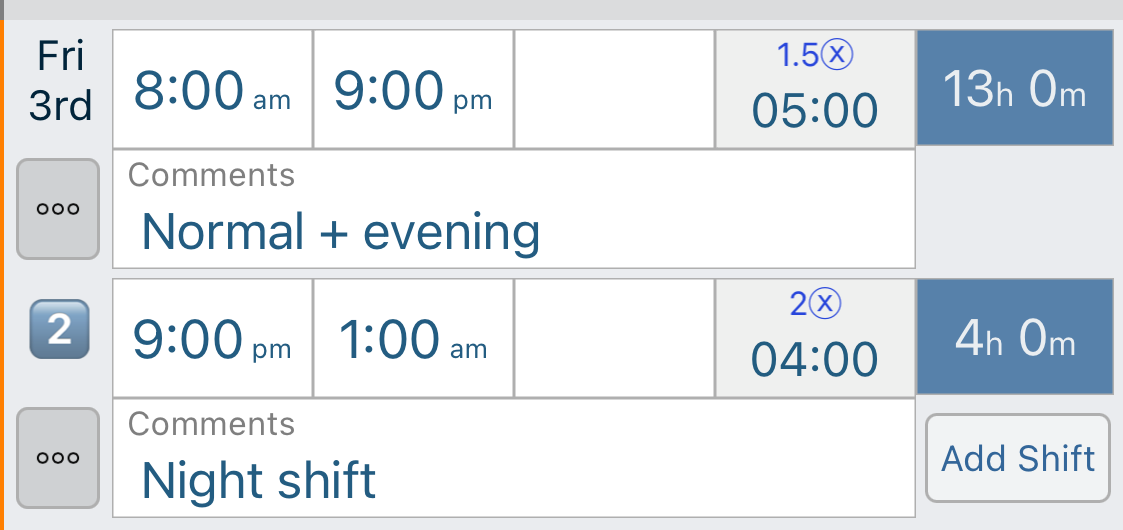
Example 2 : Normal shift (8 hours) followed by Evening shift (5 hours) paid at 1.5x then night (4 hours) at 2x.
Normal time is 8am to 4pm with Evening 4pm to 9pm then Night from 9pm to 1am
Shift 1 - Enter 8am to 9pm as in Example 1 and set the same OT Multiplier(1.5) and Normal Hours(8).
Tap Add Shift and enter 9pm to 1am
Tap the more button ![]() for shift 2
for shift 2
Set Overtime Rate Multiplier to 2.0 and Normal Hours to 0.
Example 3 : All time worked is overtime - i.e Public Holiday
Enter Start and End Times.
Tap the more button ![]()
Set Normal Work Hours to 0
Set the Overtime Rate Multiplier to i.e 2.5 for Double time and a half. This will pay all hours at your normal hourly rate x 2.5
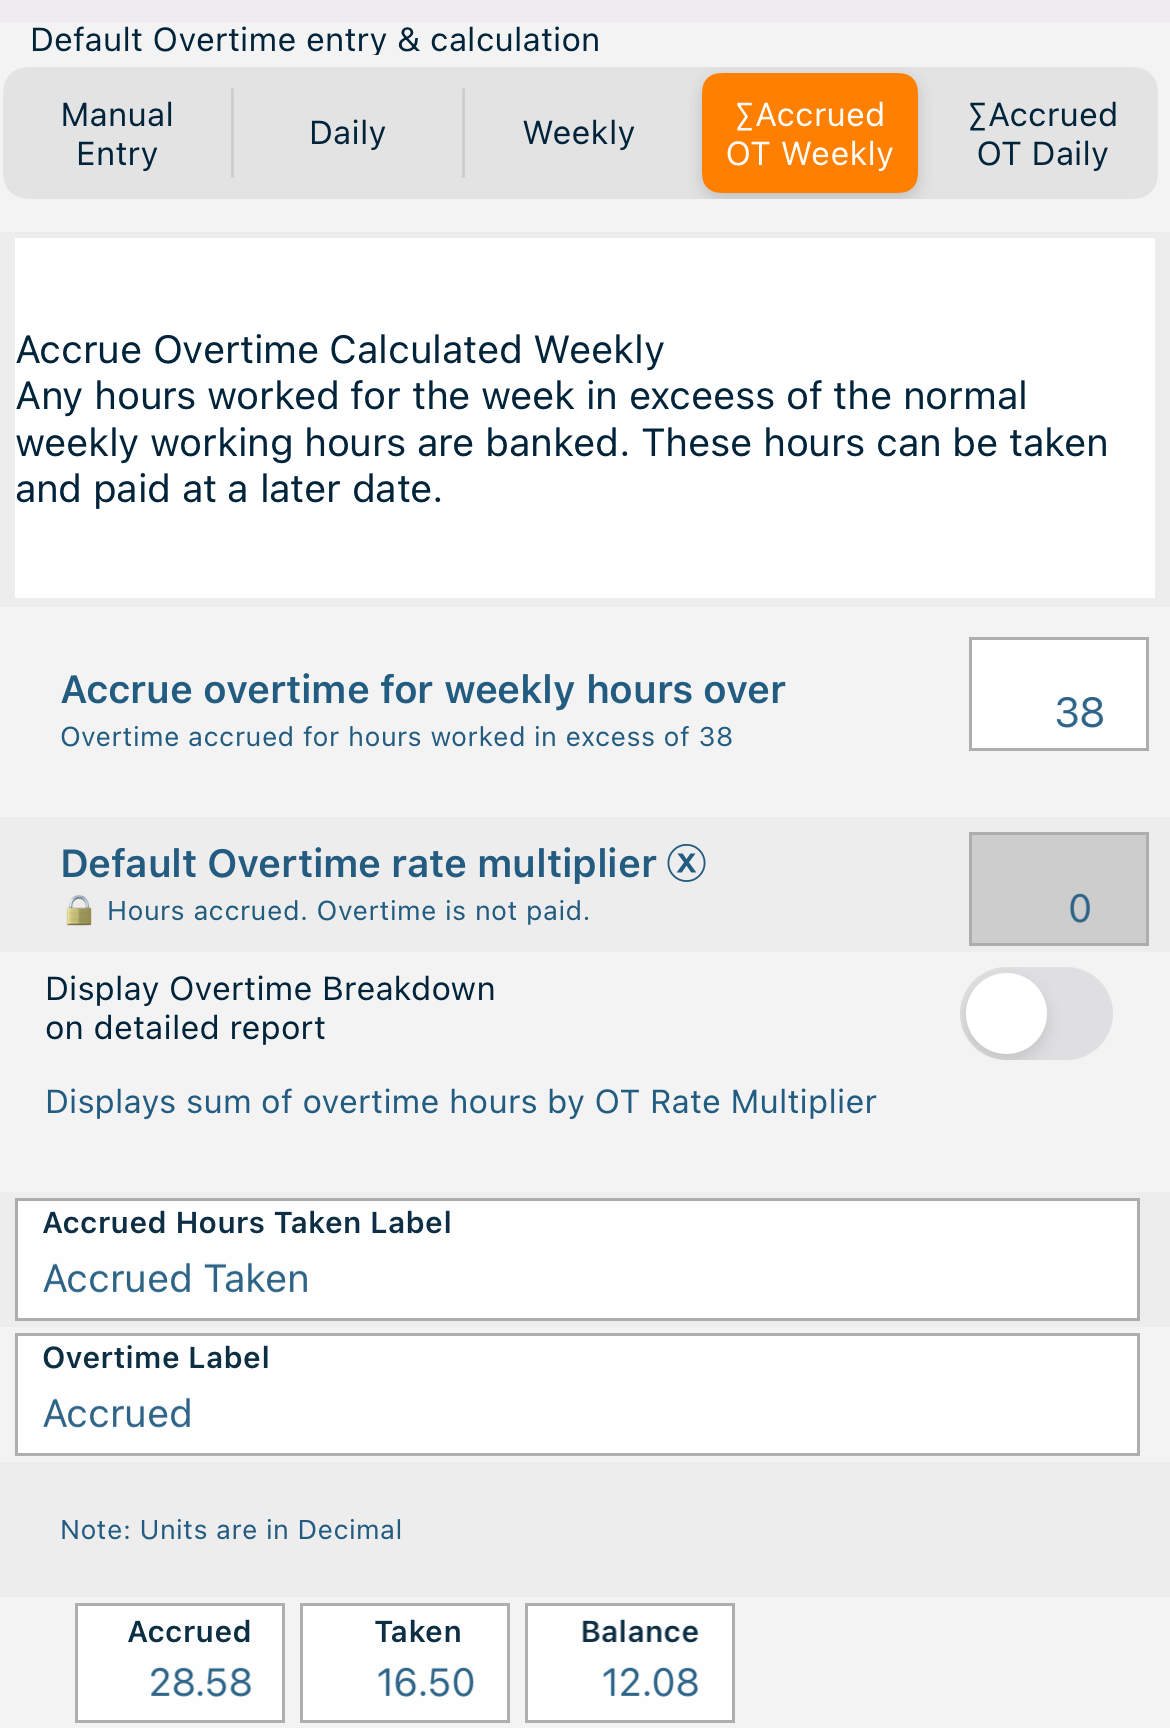
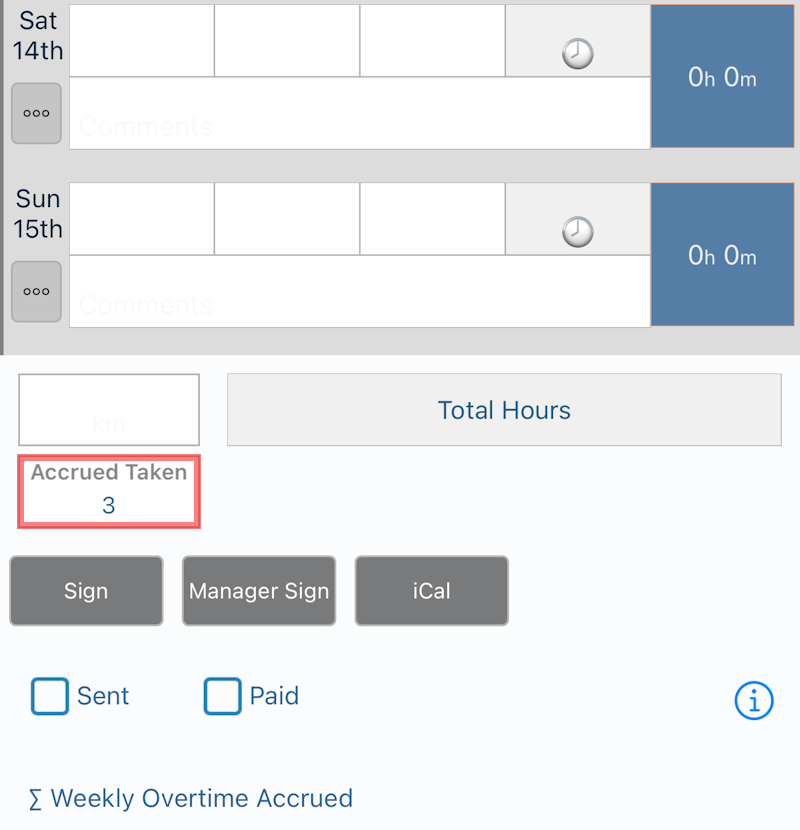
Overtime can be accrued weekly or daily and paid out at a later date.
Weekly
- Set your normal working hours for the week
- Excess hours are accrued weekly (banked)
- Set your normal working hours each day
- Excess hours are accrued daily (banked)
Paid Breaks
Q
I'm paid for my breaks..
A
Turn on the Paid Break option via Settings.
Taxes
Q How do I include taxes?
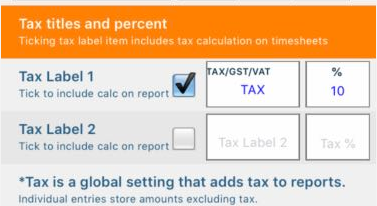
A Navigate to Settings. Enter the tax label (GST/TAX/VAT etc) and %.
The tax is calculated based on the hourly rate set for the client and is added to the amount.
 Timesheet Plus
Ooooppps - You downloaded the wrong app...
Timesheet Plus does not feature biweekly or monthly reports.
For these features please download Timesheet PDF or TTN from the App store or Google Play.
All rates are set against the Client.
Select and edit a client and enter the hourly and travel rates to be applied.
![]() Apple
Apple
Tap the down arrow followed by edit/delete to enter delete mode.
Note:
The delete function is disabled in the trial version.
Subscription is required to unlock deleting entries.
Please checkout the links below for help on setting up email.
https://support.apple.com/en-au/HT201320
https://support.microsoft.com/en-us/office/set-up-email-in-android-email-app-71147974-7aca-491b-978a-ab15e360434c
![]() Apple-Restore Data
Apple-Restore Data
On the old phone backup data via Settings>Cloud
On the new phone restore via Settings>Cloud
**Make sure you are signed into the same Cloud Account.
Timesheet Plus - only allows single entry per day (to keep it simple).
Timesheet PDF - On Apple (iOS) tap Add Shift or on Android tap + button to create a 2nd shift for the day.
Please download Timesheet PDF or TTN which has this feature and more as below
- Multiple entries per day
- Submit time electronically or send PDFs
- Sync across devices
- Custom report periods
- Web app for employer to view all time
Read More...
 TTN
TTN
Contact
If you can't find an answer to your question in the FAQ or have a general enquiry, simply fill in your details and drop us your request.
